A ©ach the track hangers as shown on page 14 (le l & right). With garage door open, center threshold between the garage door track (the channel the door rollers ride in).
Garage Door Seal Installation Instructions, Cut rp133 to marked length using a hacksaw. We welcome messages or emails with images if you are.
 Floor Seals Online Garage Door Spares From onlinegaragedoorspares.com
Never neglect these basic rules when working on any. Position rp141 so the hump is inside the garage door bottom when closed (fig.1). This is where our in house movies demonstrating how weather seal works can be found! Welcome to the garage door weather seal video page.
Position rp133 so the hump is inside the garage door bottom when closed.
Step 4:starting at the end (fig 4), tap the fasteners halfway into the seal, beginning at 6” from the end and continuing every 12” on center. Welcome to the garage door weather seal video page. Step 4:starting at the end (fig 4), tap the fasteners halfway into the seal, beginning at 6” from the end and continuing every 12” on center. First rule for any garage door repair: Close the garage door and &t the threshold in position to butt up to the garage door to provide the seal, ensuring the door can still latch and lock. Step 2:mark your first piece of perimeter seal for cutting (fig 2).
 Source: doorseal.com.au
Cut rp141 to marked length with hacksaw. Prior to installing the door seal in. 2.slide old seal out one end. Mark rp141 at each end where it needs to be slotted to seal neatly around garage door track (fig.2). Mark rp133 at each end where it needs to be notched out to seal neatly around the garage door track.
 Source: pinterest.com
(the “hump” side should on the inside side of the door.) 2. Remove existing garage door bottom seal. Additional micro track adjustments may be required to achieve optimal seal compression and energy efficiency. Remove scratches in the acrylic window pane with a quality plastic window cleaner. Open garage door and measure the full distance between the inside of the garage.
 Source: pinterest.com
If your door and the walls are not insulated, it can let in cold air into the garage and trap warm air when it’s hot.similarly, sealing by adding blocks to lock out unwanted sounds is a good idea. Doors with double low track, high lift or vertical lift application will have additional instructions for those applications. Mark rp141 at each.
 Source: garagedoorthresholdseal.com
Some garage door manufacturers will pinch the aluminum track to hold the bottom seal in place. 2.slide old seal out one end. Cut rp133 to marked length using a hacksaw. Prior to installing the door seal in. (the “hump” side should on the inside side of the door.) 2.
 Source: doorseal.com.au
Attach track to garage door bottom by starting at far left edge of the garage door. Install the (ohu) bo ©om bracket into holes #21, #22, & #18 as shown in fig 1, using (3) 1/4”x5/8” red universal fasteners. Heavy duty garage door floor threshold weather seal. Cut rp141 to marked length with hacksaw. (the “hump” side should on the.
 Source: onlinegaragedoorspares.com
We welcome messages or emails with images if you are. *since garage doors are manufactured with varying types of weather seal retainer designs, please contact clopay for the proper type of replacement weather seal. Open garage door and measure the full distance between the inside of the garage door tracks. Attach track to garage door bottom by starting at far.
 Source: doorseal.com.au
To open a pinched track, insert a flathead screw driver, into the end of the track, and gently pry open the end, just enough to allow removal of the old door seal. This keeps the weather and debris out as well as improving the look of your door by covering the gaps between the door and the door jamb. Garage.
 Source: soundproofliving.com
Close the garage door and &t the threshold in position to butt up to the garage door to provide the seal, ensuring the door can still latch and lock. How to measure for door dam. Warning instructions for p/n 0620131 bulb. Unplug garage door opener and manually disconnect opener from the door, if applicable. Installing a garage door threshold or.
 Source: northshorecommercialdoor.com
Using a power drill/driver, install one screw ½” from the edge, through the center of the track and into the garage door. Cut rp141 to marked length with hacksaw. Prior to installing the door seal in. Bottom of the garage door for proper seal. Next, clamp the door in place, either up or down depending on the task, using vice.
 Source: rollupdoorsdirect.com
Please call us on 1300 887 438 or email sales@cleverseal.com and we would be happy to provide you the information you are looking for. Clopay garage doors installation instructions mycoffeepot org clopay garage door bottom seal 9 l com 3 easy diy garage door projects home matters ahs How to measure for door dam. Simple installation instructions for your garage.
 Source: smartgarage.ca
Remove existing garage door bottom seal, if applicable. Position rp141 so the hump is inside the garage door bottom when closed (fig.1). 2.slide old seal out one end. Please note that the following instructions are meant to provide guidance to assist in the fitting of the syg seals but due to large number of variables that might impact an install,.
 Source: theydesign.net
A ©ach the track hangers as shown on page 14 (le l & right). A weather seal is your most important ally when it comes to keeping the elements where they belong: Close the garage door and &t the threshold in position to butt up to the garage door to provide the seal, ensuring the door can still latch and.
 Garadry") Source: garadry.com
Source: garadry.com
2.slide old seal out one end. Warning instructions for p/n 0620131 bulb. Clean the acrylic windows with a soft wet cloth. Open garage door to full open position. “specific product sheets” (steel, thermospan, etc.) must accompany this “general installation manual”.
 Source: support.garagedoorzone.com
Position the track so it is flush with the outside edge of garage door (edge closest to the street when the door is closed). Door openers always keep the garage door in full view while using the electric opener. With garage door open, center threshold between the garage door track (the channel the door rollers ride in). Using a power.
 Source: garageflooringllc.com
Additional micro track adjustments may be required to achieve optimal seal compression and energy efficiency. Please call us on 1300 887 438 or email sales@cleverseal.com and we would be happy to provide you the information you are looking for. A weather seal is your most important ally when it comes to keeping the elements where they belong: Some garage door.
 Source: snirtstopper.com
Attach track to garage door bottom by starting at far left edge of the garage door. Heavy duty garage door floor threshold weather seal. To open a pinched track, insert a flathead screw driver, into the end of the track, and gently pry open the end, just enough to allow removal of the old door seal. Some garage door manufacturers.
 Source: pinterest.com
Step 4:starting at the end (fig 4), tap the fasteners halfway into the seal, beginning at 6” from the end and continuing every 12” on center. Attach track to garage door bottom by starting at far left edge of the garage door. Allow copper metal doors to age naturally and gracefully. Repeat for the le l side bo ©om bracket..
 Source: doorseal.com.au
Bottom of the garage door for proper seal. Position rp133 so the hump is inside the garage door bottom when closed. Additional micro track adjustments may be required to achieve optimal seal compression and energy efficiency. Using a power drill/driver, install one screw ½” from the edge, through the center of the track and into the garage door. Manually close.
 Source: youtube.com
Open garage door and measure the full distance between the inside of the garage door tracks. Remove existing garage door bottom seal, if applicable. Some garage door manufacturers will pinch the aluminum track to hold the bottom seal in place. This is where our in house movies demonstrating how weather seal works can be found! Close the garage door and.
 Source: cleverseal.com
Remove existing garage door bottom seal, if applicable. Please note that the following instructions are meant to provide guidance to assist in the fitting of the syg seals but due to large number of variables that might impact an install, please contact us if you are unsure which of our products would suit your application best. Garage door seal installation.
 Source: garagedoorstuff.com
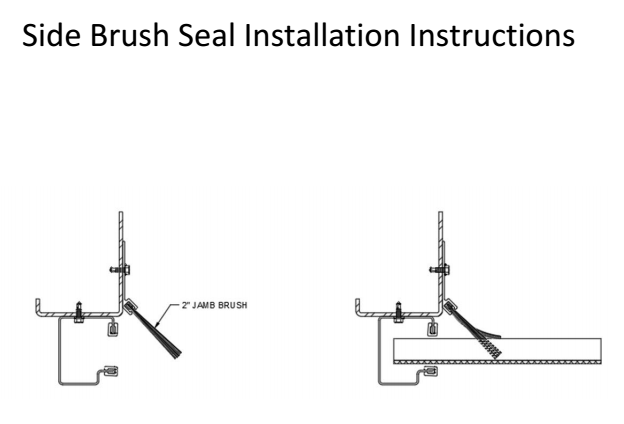
A ©ach the track hangers as shown on page 14 (le l & right). If applicable, reconnect the automatic garage door opener and plug opener into the electrical outlet. Garage door top and side weather seal installation. Next, clamp the door in place, either up or down depending on the task, using vice grips, one on each side of the.
 Source: northshorecommercialdoor.com
Repeat for the le l side bo ©om bracket. A weather seal is your most important ally when it comes to keeping the elements where they belong: Garage door seal installation oscarsplace furniture ideas garage door weather seal wood doors. Cut rp133 to marked length using a hacksaw. Heavy duty garage door floor threshold weather seal.
 Source: motherdaughterprojects.com
Trim to length with utility knife. Mark rp141 at each end where it needs to be slotted to seal neatly around garage door track (fig.2). Tsunami sear garage door threshold seal installation instructions: One great product to seal your garage door is pvc stop molding. 2.slide old seal out one end.
 Source: garagedoorsupplyco.com
With garage door open, center threshold between the garage door track (the channel the door rollers ride in). Cut rp141 to marked length with hacksaw. Cut rp133 to marked length using a hacksaw. If in question about any of the procedures, contact a qualified door agency. *since garage doors are manufactured with varying types of weather seal retainer designs, please.
 Source: pinterest.com
2.slide old seal out one end. A ©ach the track hangers as shown on page 14 (le l & right). Never neglect these basic rules when working on any. Step 4:starting at the end (fig 4), tap the fasteners halfway into the seal, beginning at 6” from the end and continuing every 12” on center. (the “hump” side should on.